In the realm of digital photography, smartphones, especially the iPhone, have carved out a significant niche for themselves. Every day, countless moments are frozen in time with a simple click, painting a rich tapestry of our lives. Yet, this abundance often leads to clutter, making photo management a daunting task. This article sheds light on the importance and advantages of organizing iPhone photos on a PC, providing insights into a more efficient approach to preserving memories.
Understanding the Need to Organize iPhone Photos on PC
With the surge in smartphone photography, particularly on devices like the iPhone, many users find themselves awash in a overwhelming number of photos. Every tap on the camera button captures a moment, but as time progresses, these moments amass, leading to an overwhelming library of photos. But why is there a compelling need to organize iPhone photos on a PC? Let’s dive in!
The Advantages of Organizing Photos on a PC vs. iPhone
| Criteria | Using a PC | Using iPhone |
| ? Screen Size | Larger screens provide a more expansive view of photo libraries, making it easier to spot duplicates or poorly-taken images. | Limited to device screen size, which can be restrictive when organizing photos. |
| ? Processing Power | Often more powerful, allowing for faster sorting, filtering, and editing of large numbers of photos. | While newer iPhones, with their advanced processors, are efficient in handling large photo libraries, While iPhones are powerful, handling extensive photo libraries might slow down the process. |
| ? Storage | Expansive storage options make it an effective backup for iPhone photos. | Storage can be limited, and extensive photo libraries can lead to storage issues. |
Challenges Faced by iPhone Users
Without an effective system to organize and manage their photo libraries, iPhone users can face several challenges:
- ? Difficulty finding specific photos amidst thousands.
- ? Running out of storage space, leading to the dreaded ‘Storage Almost Full’ message.
- ? Inability to create meaningful albums or collections for easier access.
- ☁️ Increased risk of losing photos due to lack of backups.
Organizing an iPhone photo library from a PC is an efficient solution to overcome these challenges. By regularly offloading and organizing photos on a PC, users can maintain a clean and easily navigable photo library on their iPhones.
As our photo libraries continue to grow, taking the time to effectively organize and backup our memories is crucial. Leveraging the advantages of a PC in this process ensures that our cherished moments are always within reach, organized, and safe.
Best Ways to Organize iPhone Photos on PC
With an abundance of digital memories captured daily, it’s essential for iPhone users to have an efficient way to organize their photos on a PC. Organizing iPhone photos not only ensures that memories are easily accessible but also helps keep one’s digital life decluttered. Let’s explore various methods and techniques to achieve this.
Method 1: Using Windows Explorer for Basic Organization
Windows Explorer offers a straightforward way to navigate and organize an iPhone photo library from a PC. Here’s how to use it:
- Connect the iPhone to the PC via USB cable.
- Open ‘My Computer’ or ‘This PC’ and locate the iPhone under ‘Devices and Drives’.
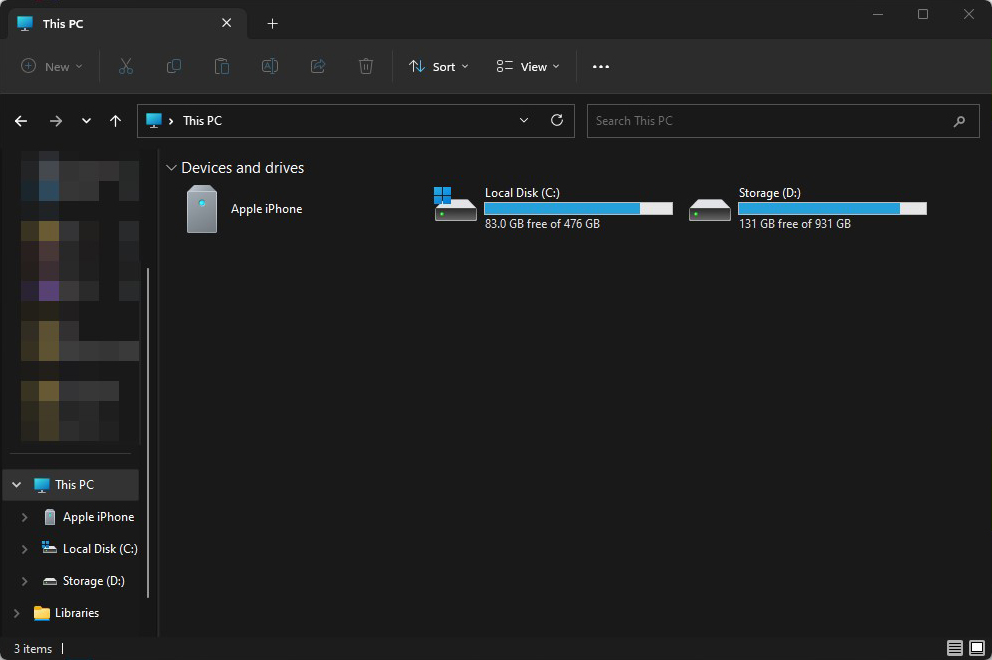
- Access iPhone storage and navigate to the DCIM folder where photos are stored.
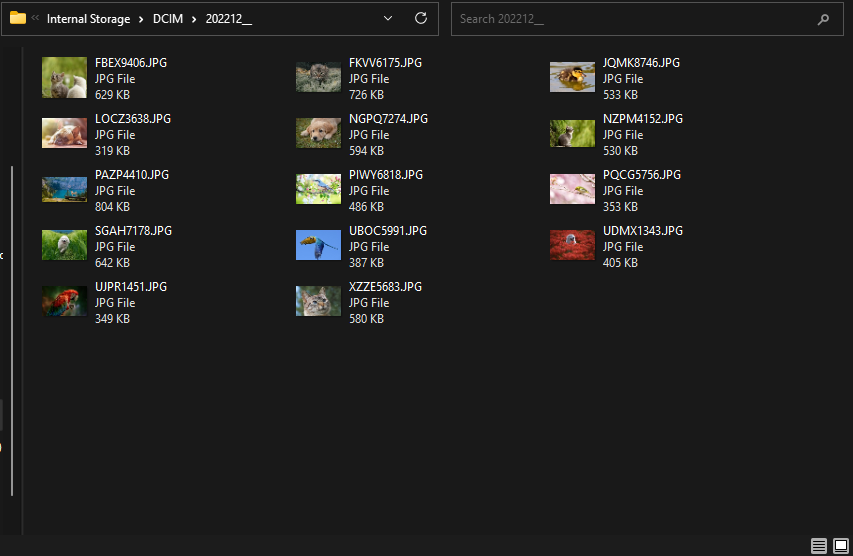
- Create new folders as desired and drag & drop photos to organize them.
Although this method provides basic organization, it may lack advanced features some users might need.
Method 2: Using iTunes to Sync and Organize Photos
iTunes isn’t just for music; it also serves as a tool to sync and organize iPhone photos with ease. Here’s how:
- Connect the iPhone to the PC and open iTunes.
- Select the iPhone icon and navigate to the ‘Photos’ tab.
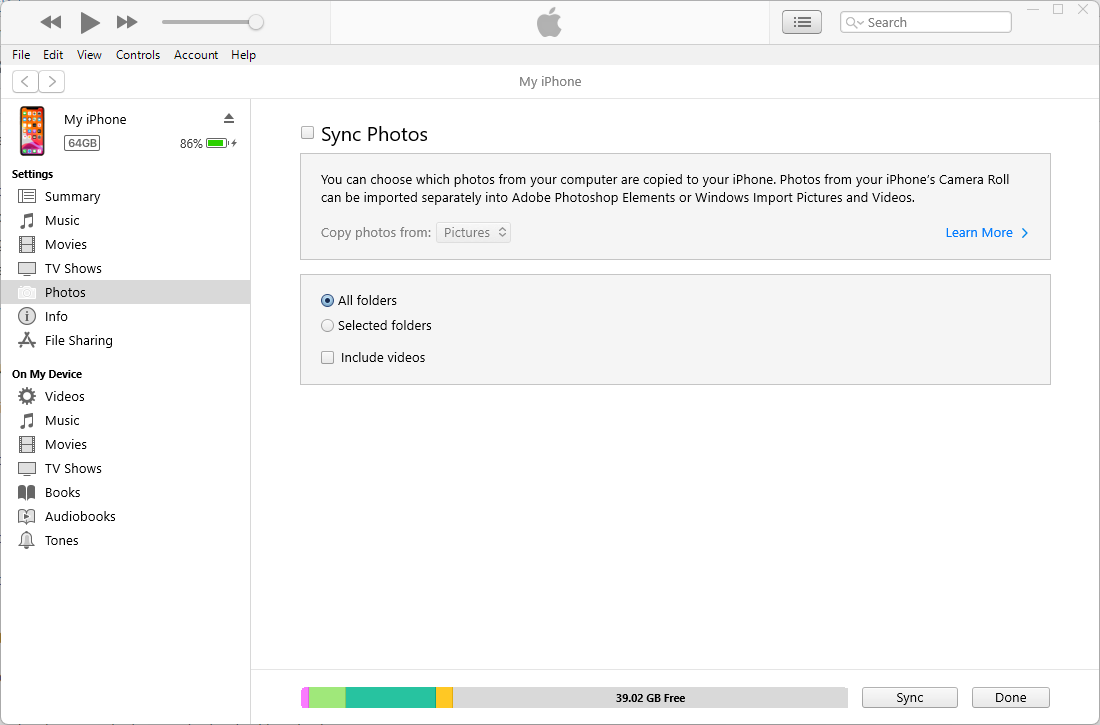
- Choose the desired photo folders from the PC to sync with the iPhone.
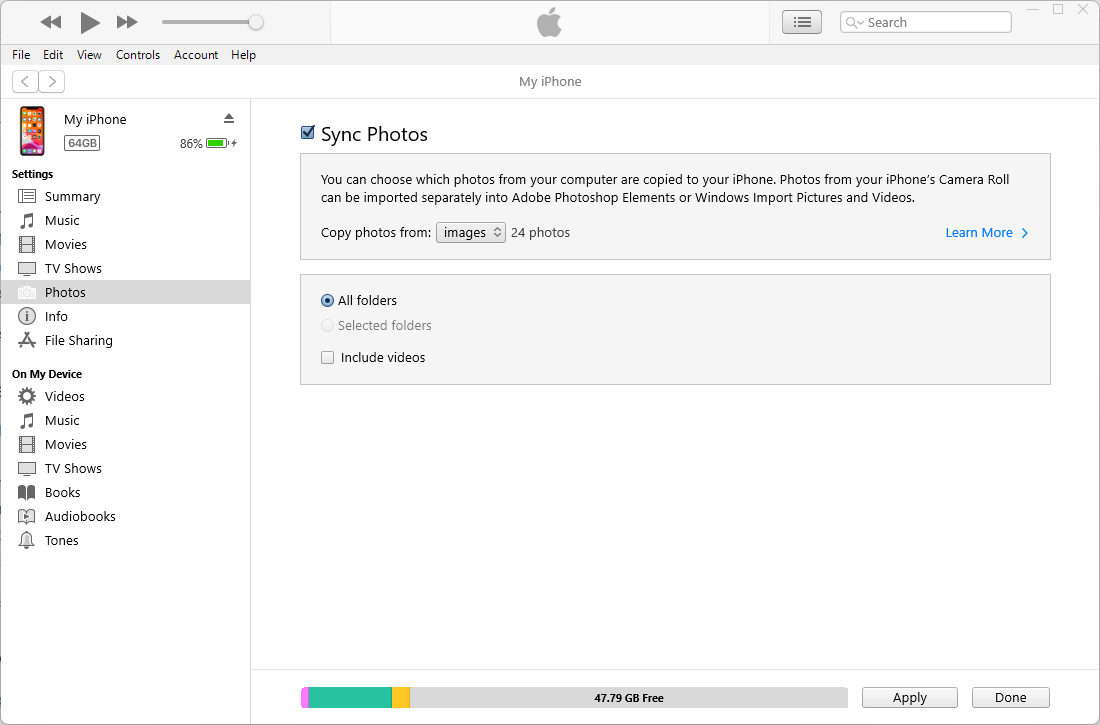
- Click ‘Apply’ to start the syncing process.
This method offers more structured organization and seamless syncing between the iPhone and PC. More about iTunes syncing can be found on Apple’s official support page.
Method 3: Third-party Software Solutions
For users seeking a more comprehensive approach to organize iPhone photos on a PC, third-party software solutions can be a game-changer. Some notable ones include:
- AnyTrans: Offers organized photo management and transfer between iPhone and PC.
- DearMob iPhone Manager: Provides encryption options along with photo organization.
When choosing a software solution, it’s crucial to consider factors like user reviews, compatibility, and feature set. Detailed comparisons and reviews are available at platforms like TechRadar.
Method 4: Cloud-Based Platforms for Organizing
Cloud platforms like iCloud and Google Photos have revolutionized how we store and organize photos. These platforms not only offer backup solutions but also allow users to organize an iPhone photo library from a PC. Here’s how:
- iCloud: Activate iCloud Photo Library on iPhone and access photos via iCloud.com on a PC. Organize, delete, or download photos as needed.

- Google Photos: Sync iPhone photos to Google Photos and organize them using a PC browser. With advanced search features and unlimited storage (for compressed photos), it’s a popular choice among many.
Using cloud platforms ensures that photos are safely backed up and accessible from any device. Further insights on using these platforms can be found on sources like CNET.
In summary, with the myriad of options available, finding the best way to organize photos on iPhone using a PC depends on individual needs and preferences. From basic file explorers to advanced cloud platforms, there’s a solution for everyone.
Tips to Efficiently Organize an iPhone Photo Library from a PC
Efficiently organizing an iPhone photo library from a PC requires a blend of strategies. Below is a table summarizing key tips to help streamline the process:
| ? Tip | ? Description |
| ?️ Naming Convention | Use consistent file naming with details like date, event, or location. Tools like Bulk Rename Utility can help with batch renaming. |
| ? Folders & Sub-Folders | Group photos into broad categories, then use sub-folders for specific events or dates using utilities like Windows Explorer or other third-party software. |
| ? Tags & Metadata | Add or modify metadata for easy searching using tools like ExifTool. |
| ? Periodic Cleanup | Regularly declutter by deleting duplicates or unnecessary photos to keep your library fresh and manageable. |
| ☁️ Backup | Regularly back up photos to avoid data loss. Read more on the importance of backups at G2. |
| ?️ Software Features | Explore software features like auto-sorting based on dates, faces, or locations in specific third-party software. |
With these strategies in mind, organizing your iPhone photos on a PC becomes a more streamlined and effective process. It ensures that cherished memories are not only well-arranged but also easily accessible when needed.
Conclusion
The digital revolution, spearheaded by smartphones, has enriched our lives with innumerable memories captured at every turn. However, with this boon comes the bane of clutter and disorganization. Leveraging the power and structure of a PC to organize iPhone photos offers a respite from this chaos. It not only facilitates a more systematic storage method but also ensures that our precious moments are categorized, safe, and easily accessible. Finding the easiest and most efficient methods as we continue to chronicle our lives through photographs, it’s essential to recognize and adopt effective managing and management practices for a richer, more organized digital experience.
FAQ
To ensure no loss in quality while transferring photos from iPhone to PC, use the following steps:
- Connect your iPhone to your PC via a USB cable.
- Unlock your iPhone and trust the computer if prompted.
- Open ‘This PC’ or ‘My Computer’ on your PC.
- Under ‘Devices and Drives,’ locate your iPhone and open it.
- Navigate to the DCIM folder to find your photos.
- Copy and paste, or drag and drop the photos to your desired location on the PC.
Yes, once the photos are transferred to your PC, you can organize them using the built-in File Explorer. Create folders, rename files, and rearrange photos as you would with any other files on your PC. However, remember that these changes will not reflect back on your iPhone.
The best way to manage iPhone photos on Windows is by using Apple’s official application, iTunes. Through iTunes, you can sync, backup, and organize your photos seamlessly. There are also third-party applications available, such as ‘iMazing’ or ‘EaseUS MobiMover’, that provide additional functionalities to manage and organize iPhone photos on Windows.
The frequency of organizing and backing up iPhone photos depends on the individual’s usage. If you take numerous photos daily, it’s a good idea to organize and backup weekly. Otherwise, a monthly routine can suffice. Regular backups ensure that you don’t lose precious memories and photos in case of any unforeseen mishaps or device malfunctions.
