Managing files and applications on your Mac can be a breeze with the right know-how. This comprehensive guide delves into the ‘Recent Items’ feature in Mac Finder, offering insights on its use, along with step-by-step instructions for management and troubleshooting. Whether you’re looking to enhance privacy, reduce clutter, or simply streamline your workflow, this article provides the essential tips and practices for efficient Finder usage.
Understanding Recent Items in Mac Finder
The ‘Recent Items’ feature in Finder is a convenient tool for Mac users, offering quick access to recently opened files, applications, and servers. However, understanding both the benefits and potential drawbacks of this feature is essential.
- How Recent Items are Generated: Each time you open a file, application, or connect to a server on your Mac, this activity is logged. The log forms the ‘Recent Items’ list, accessible from the Apple menu and within Finder.
- Significance for Users: This feature allows swift access to frequently used files and applications, enhancing efficiency. For instance, ‘Recent Items’ can keep your project documents readily accessible over several days.
Some concerns associated with ‘Recent Items’ include:
- Privacy Concerns: In shared or public settings, the ‘Recent Items’ list could expose sensitive information or documents.
- System Clutter and Performance: While a lengthy list of recent files doesn’t significantly slow down your Mac, it can contribute to system clutter. Regularly clearing this list can help maintain a tidy and efficient workspace.
Being mindful of the items in this list and knowing how to manage them is crucial for maintaining your Mac’s efficiency and security.
Step-by-Step Guide to Clear Recent Items in Finder
Managing the ‘Recent Items’ list in Mac Finder can be done through various methods, each catering to different user needs. Here are simple and user-friendly instructions.
Clearing Recent Items from the Apple Menu
- Access the Apple Menu: Click the Apple logo at the top left corner of your screen.
- Locate Recent Items: In the dropdown menu, select ‘Recent Items.’
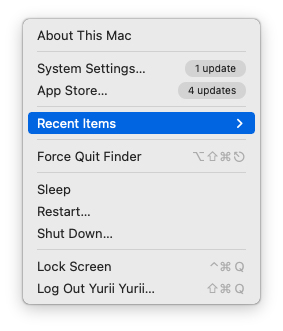
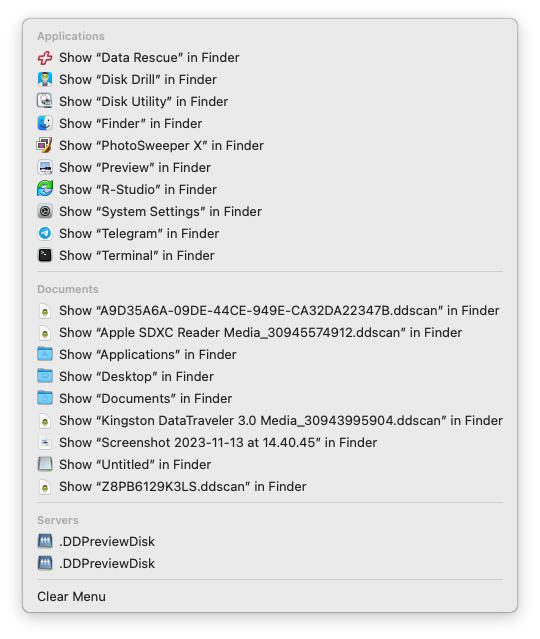
- Clear the List: Choose the ‘Clear Menu’ option at the bottom of the list to remove all items.
Removing Startup Disk from Spotlight Search
- Open System Preferences: Click the Apple logo and select ‘System Preferences.’
- Navigate to Spotlight: Choose ‘Siry & Spotlight’ and then the ‘Spotlight Privacy’ tab.
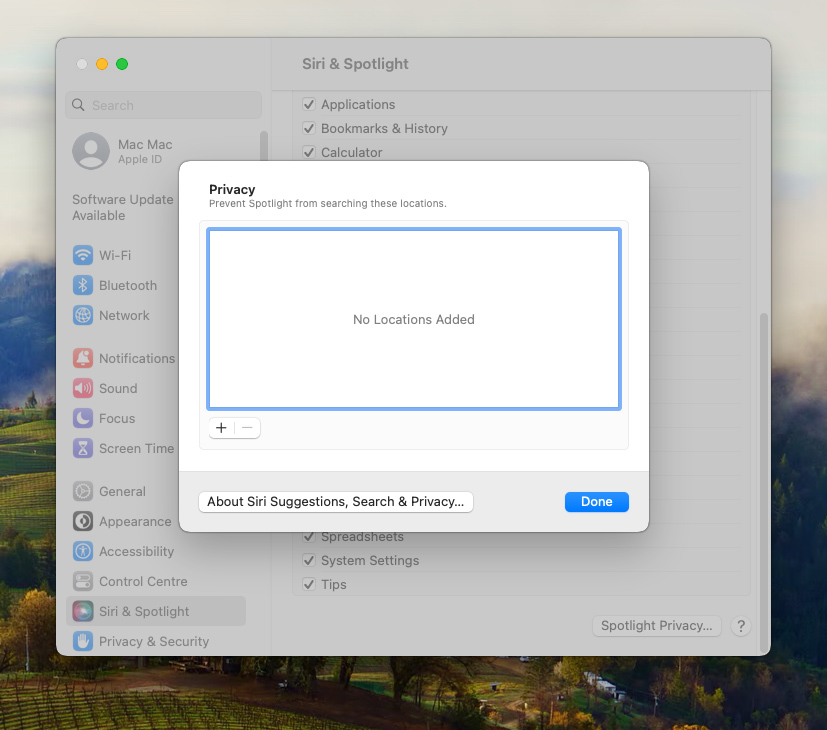
- Prevent Spotlight from Indexing: Click the ‘+’ button to add your startup disk or specific folders, preventing Spotlight from indexing them and affecting their appearance in the ‘Recent Items’ list.
Hiding Specific Files or Folders in Finder
- Rename the File or Folder: Add a period (.) at the beginning of the file or folder name to make it hidden in Finder.
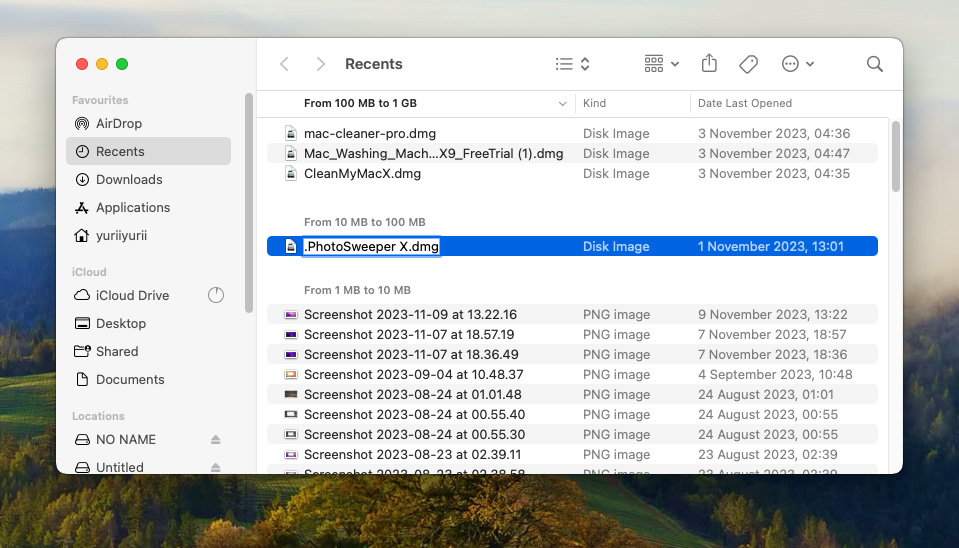
- Confirm the Change: This action will hide the file or folder from Finder views, though it may still appear in ‘Recent Items’ in Apple menu unless cleared using one of the above methods.
Regular management of your Mac’s recent items and file visibility is crucial for maintaining a tidy, efficient, and secure workspace.
Troubleshooting: When You Can’t Clear Recent Items in Mac Finder
At times, clearing recent items in Finder or Preview may pose challenges. This section provides solutions to common issues.
- Issue: ‘Clear Recent Items’ Option is Grayed Out
Solution: If the application is in use, this option may be unavailable. Close any open windows and try again. Restarting your Mac can also help. - Issue: Recent Items List Not Updating After Clearing
Solution: Restart the Finder or Preview app. If the issue persists, a system restart can often resolve such glitches. - Issue: Can’t Find the ‘Recent Items’ List
Solution: The ‘Recent Items’ list is typically under the ‘File’ menu in Finder. Ensure you’re using the latest version of macOS for the correct menu layout. - Issue: ‘Recent Items’ List Clears Automatically
Solution: Check your Mac’s General settings. If ‘Recent items’ is set to clear automatically, adjusting this setting can resolve the issue.
For additional assistance, the Apple Support website offers comprehensive guides, and the Apple Support Communities can provide valuable user-driven advice.
Regular updates and restarts can prevent many common issues, including those related to clearing recent files in Finder and Preview.
Prevention and Best Practices: Keeping Your Mac Finder Organized
Maintaining an organized Finder is crucial for a smooth Mac experience. Here are some best practices for file management and preventing clutter, especially in the ‘Recent Items’ section.
- Regular Maintenance: Consistently review and organize your files, deleting unnecessary items and arranging frequently used ones for easy access.
- Use Folders and Tags: Categorize files into folders and use tags in Finder for quick organization and retrieval.
- Manage Downloads: Keep your Downloads folder clear of unnecessary files to avoid clutter.
- Use Smart Folders: Smart Folders automatically group files based on set criteria, aiding in organization.
By incorporating these habits into your routine, you can ensure a more efficient and clutter-free workspace.
For detailed strategies on file management and keeping Finder organized, explore resources like Apple’s Finder guide and iMore.
Conclusion
Efficiently managing ‘Recent Items’ in Mac Finder enhances your computing experience, safeguarding privacy and maintaining an organized digital workspace. Through this guide, we’ve explored handling recent items, clearing methods, troubleshooting, and best practices for ongoing organization. Regular application of these strategies can improve your interaction with your Mac, ensuring a smoother, secure, and clutter-free environment. Remember, a well-organized Finder is key to a productive and enjoyable Mac experience.
FAQ
To clear your recent browsing history in Safari, click on ‘History’ in the menu bar and then select ‘Clear History.’ You can choose the time range to clear, from the last hour to all history. This action clears your browsing history, cookies, and other browsing data.
To delete your activity history, go to ‘System Preferences,’ then ‘Security & Privacy,’ and select the ‘Privacy’ tab. Click on ‘Analytics & Improvements,’ where you can view and manage your activity history. You can also use Spotlight to search for and delete specific files or activity logs stored on your Mac.
Clearing your downloads involves two steps. First, open the ‘Downloads’ folder in Finder and manually delete the files you no longer need. Then, to clear the list of downloaded items in Safari, click on ‘View’ in the Safari menu, select ‘Show Downloads,’ and then manually clear items from the list. Remember, deleting items from the Downloads folder removes them permanently from your Mac.
