Mac computers have a cool feature called sleep mode that helps save energy and extend battery life. It’s a smart way of powering down non-essential parts while keeping your active tasks intact. Sleep mode strikes a balance between efficiency and convenience. In this article, we’ll dive into Mac’s sleep settings, explaining how they work and how you can customize them. Whether you want to fine-tune power management or personalize your Mac’s behavior, understanding sleep settings is key. Let’s explore how you can make the most of this feature.
Understanding Mac Sleep Settings
Mac computers come with sleep mode to optimize power consumption and battery life. When your Mac goes into sleep mode, it shuts down unnecessary components while preserving the state of active tasks. Let’s learn more about sleep mode on Mac and how you can customize the settings to your liking.
What is Sleep Mode on a Mac?
Sleep mode, also known as standby, is a power-saving state that kicks in when your Mac is not in use. It turns off the display, stops background processes, and puts the hard drive to sleep. But it keeps the system memory powered so that you can quickly resume your work when you wake it up.
Default Sleep Settings and Their Purpose
By default, Mac computers are set to enter sleep mode after a certain period of inactivity. The exact settings vary depending on your Mac model and macOS version, but the general aim is to find a balance between conserving power and convenience.
Here are some default sleep settings and what they do:
- Display Sleep: This setting determines how long your Mac’s screen stays idle before it turns off to save power. You can adjust it to your liking. To change the display sleep time, go to System Settings > Energy Saver and adjust the “Turn display off after” slider.
- Computer Sleep: This setting determines how long your Mac waits before entering a deeper sleep state. It conserves more power by reducing system activity. To change the computer sleep time, go to System Settings > Energy Saver and adjust the “Put the computer to sleep when it is inactive for” slider.
By customizing these sleep settings, you can make your Mac sleep the way you want. If you prefer a longer awake time before sleep, increase the sleep time. If you want to save power more aggressively, decrease it.
Remember that changing sleep settings may affect your Mac’s performance and battery life. So find the right balance that suits your power-saving needs while keeping a smooth user experience.
Overall, understanding and adjusting sleep settings on your Mac can help you optimize power usage, prolong battery life, and personalize your computer’s behavior.
How to Change Sleep Time on Mac
Changing sleep time settings on your Mac helps optimize power management and customize sleep behavior. Whether you want to adjust when your Mac goes to sleep or tweak sleep mode settings, there are a couple of methods you can use.
Method 1: Adjusting Sleep Settings in System Settings
To change the sleep time on your Mac using System Settings, follow these steps:
- Click on the Apple menu in the top-left corner of your screen and select “System Settings.”
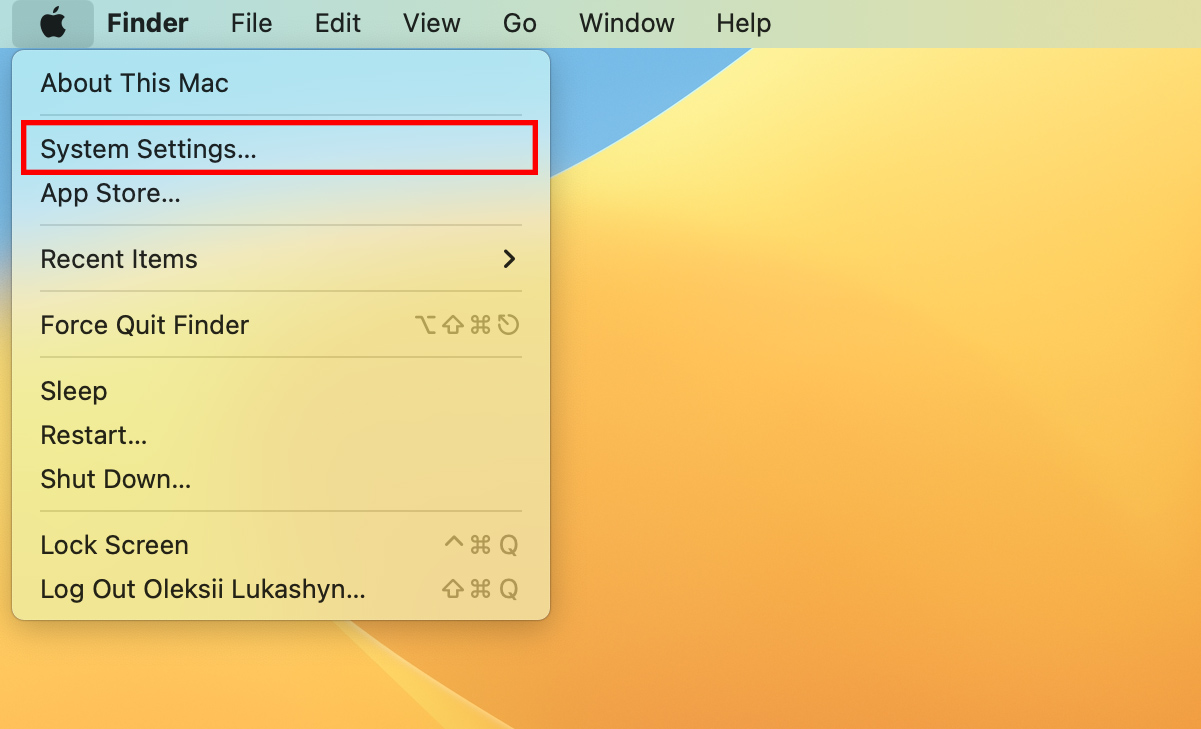
- In the System Settings window, select “Lock Screen” from the left sidebar.
- In the Lock Screen preferences, you’ll find options to adjust the sleep settings.
- Use drop-down menus to change turn display off time. This determines how long your Mac remains idle before it goes to sleep.
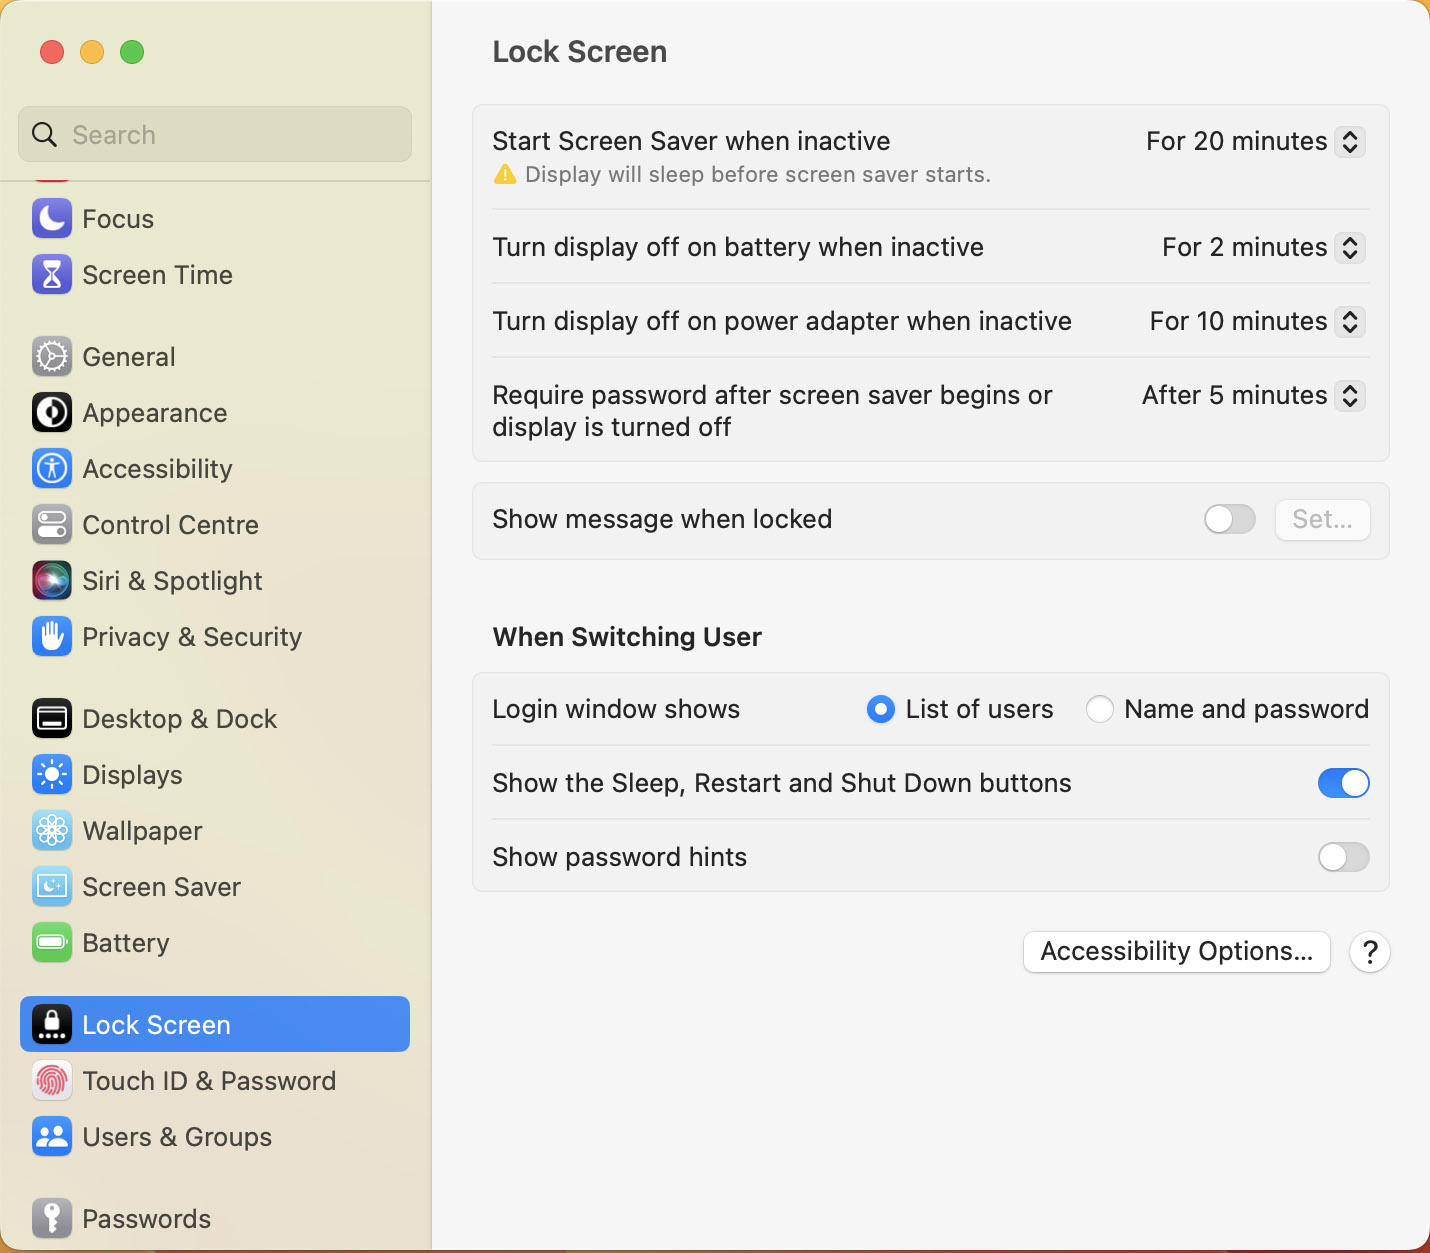
This comprehensive guide offers step-by-step instructions for fine-tuning your sleep settings on your Mac with macOS 13 Ventura. For specific steps tailored to your macOS version, please consult the official Apple support page on adjusting sleep settings.
Method 2: Using Terminal Commands
If you prefer a more advanced method, you can use Terminal commands to change the sleep time on your Mac. Here’s how:
- Launch the Terminal application, which you can find in the Utilities folder within the Applications folder or by using Spotlight search.
- In the Terminal window, type the following command to change the sleep time to a specific value (in seconds):
sudo systemsetup -setcomputersleep [time in minutes]Replace “[time in minutes]” with your desired duration, like 60 for 1 hour. Press Enter to execute the command.
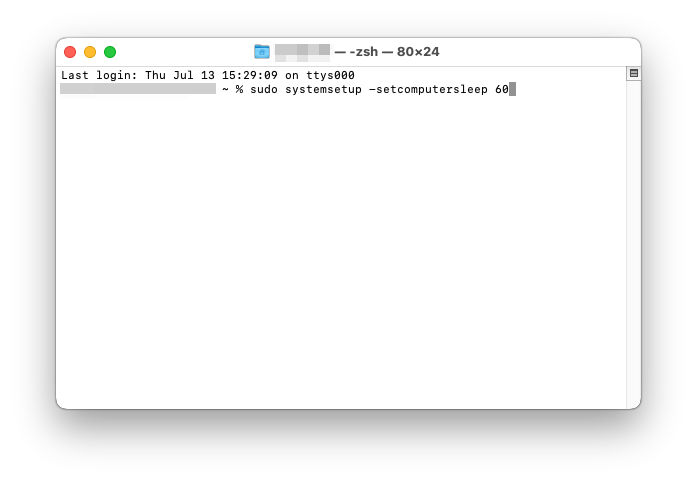
Keep in mind that using Terminal commands requires administrative privileges, and modifying certain system settings can have unintended consequences if done incorrectly. So always double-check the commands and their effects before executing them.
By following either of these methods, you can easily change the sleep time on your Mac and fine-tune its power management to suit your preferences and workflow.
Advanced Sleep Settings and Customization Options
When it comes to managing your sleep preferences on a Mac, there are various advanced settings and customization options available. These options allow you to tailor your sleep settings to your specific needs and save power when your device is not in use. Let’s explore some key features and how you can make the most of them.
Hibernation
Hibernation is another sleep-related feature that allows your Mac to save its current state to the hard drive before entering a low-power mode. It ensures that when you turn on your Mac after hibernation, you can resume your previous session exactly as you left it.
By default, Mac computers don’t hibernate. However, if you want to enable hibernation, you can use the following command in the Terminal:
sudo pmset -a hibernatemode 25Enabling hibernation can be useful if you frequently need to preserve your work across extended periods of inactivity or if you want to conserve battery power for an extended period.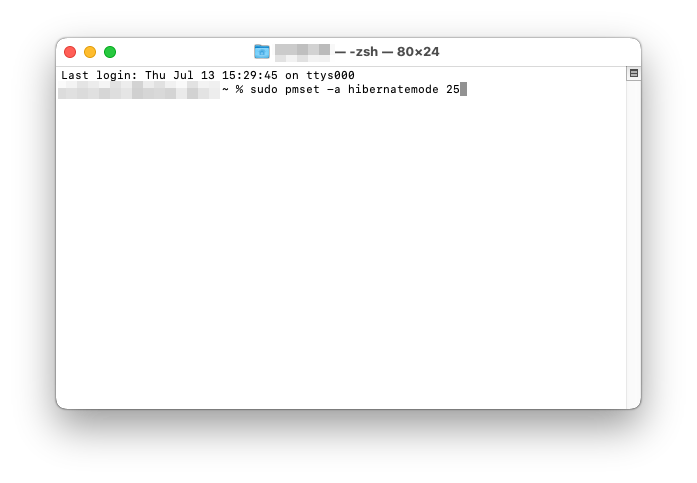
Power Nap
Power Nap is a feature available on certain Mac models that allows your device to perform various background tasks while it’s asleep. These tasks include receiving new email messages, updating iCloud data, syncing calendar events, and performing Time Machine backups.
To enable Power Nap on a compatible Mac, follow these steps:
- Click on the Apple menu in the top-left corner of your screen.
- Select “System Settings” from the drop-down menu.
- Click on “Energy Saver.”
- Check the box next to “Enable Power Nap.”
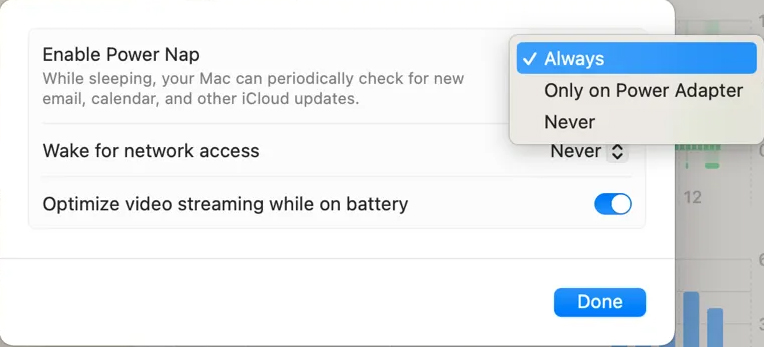
Power Nap ensures that your Mac stays updated and synced even when it’s in sleep mode, providing a seamless experience when you wake it up.
By taking advantage of these advanced sleep settings and customization options, you can optimize your Mac’s sleep behavior to align with your preferences and enhance power management.
Troubleshooting Sleep Issues
Step 1: Checking for Software Updates
Keeping your operating system up to date is crucial for maintaining optimal performance and resolving potential sleep-related issues on your Mac. Software updates often include bug fixes, improvements, and compatibility enhancements that can address sleep issues.
To check for software updates on your Mac, follow these steps:
- Click on the Apple menu in the top-left corner of the screen.
- Select “System Settings” from the drop-down menu.
- In the System Settings window got to “General” and click on “Software Update.”
- If an update is available, click on the “Update Now” button to install it.
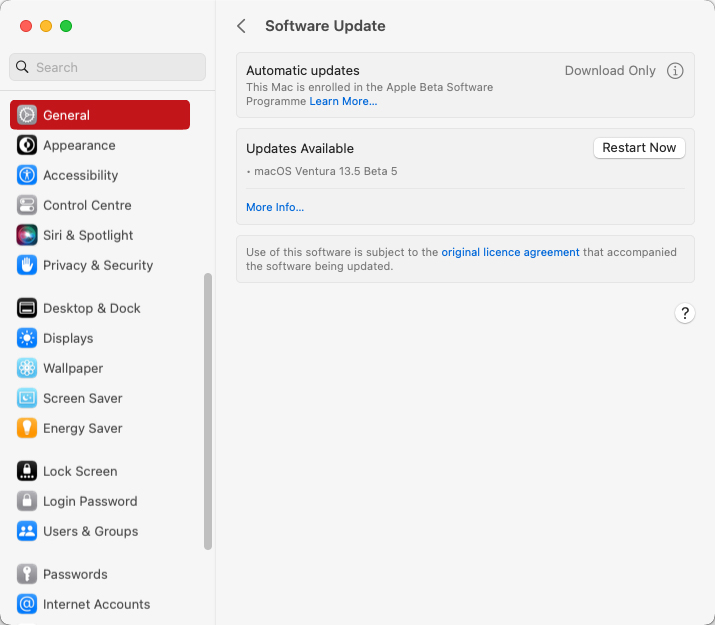
For more detailed instructions and information, you can visit the official Apple support page on checking for software updates.
Step 2: Verifying Power Source and Charger
A stable power source is essential for proper sleep functionality on your Mac. If there are any issues with the power source or charger, it can lead to sleep problems. Here are some tips to ensure your power source and charger are working correctly:
- Check the power cable for any visible damage or fraying.
- Try using a different power outlet to rule out any issues with the socket.
- If you’re using a MagSafe charger, make sure the connectors are clean and free from debris.
- Consider using a different charger or power adapter to see if the issue persists.
For more information on troubleshooting power-related problems, you can refer to the Apple support article on Mac notebooks: Troubleshooting power issues.
Step 3: Resetting SMC and NVRAM
Resetting the System Management Controller (SMC) and Non-Volatile Random-Access Memory (NVRAM) can often help resolve sleep-related issues on a Mac. These components store important settings and can sometimes become corrupted or misconfigured, leading to sleep problems. Follow these step-by-step instructions to reset SMC and NVRAM:
- Shut down your Mac completely.
- Press and hold the power button for at least 10 seconds.
- Release the power button, then wait for a few seconds.
- Turn on your Mac by pressing the power button again.
For detailed instructions on resetting SMC and NVRAM on different Mac models, you can visit the official Apple support page on How to reset the System Management Controller (SMC) on your Mac.
By following these troubleshooting steps, you can improve the sleep functionality of your Mac and address any sleep-related issues you may encounter.
Additional Tips for Sleep Management
In addition to the existing information on sleep management for Mac, here are some additional tips and tricks to further optimize your sleep settings:
- Disable Wake for Network Access: By default, Mac computers are set to wake up when accessed over the network. If you don’t need this feature, you can disable it to prevent unnecessary wake-ups. Go to System Settings > Energy Saver > Wake for network access, and uncheck the box.
- Avoid Using Power Nap: Power Nap allows your Mac to perform certain tasks, like receiving emails and performing backups, even while it’s asleep. But if you want to save power and reduce sleep disruptions, you can consider disabling Power Nap. To do this, go to System Settings > Energy Saver and uncheck the “Enable Power Nap” option.
- Close Network-Intensive Applications: Before putting your Mac to sleep, make sure to close network-intensive applications like file-sharing programs or cloud-syncing services. These apps can prevent your Mac from entering sleep mode or cause frequent wake-ups.
- Check Activity Monitor: Use the Activity Monitor utility to identify any processes or applications that might be preventing your Mac from entering sleep mode. Look for high CPU or network usage and close or troubleshoot the problematic apps accordingly.
- Avoid Scheduling Conflicts: If you have scheduled tasks like Time Machine backups or software updates, ensure they don’t run during your preferred sleep times. Conflicting schedules can interrupt sleep mode and impact power management.
By incorporating these additional tips, you can optimize sleep mode on your Mac, ensuring efficient power usage and a personalized experience.
Conclusion
In conclusion, Mac’s sleep mode is a powerful tool for optimizing energy usage and personalizing user experience. By adjusting sleep settings, such as display sleep and computer sleep, users can strike a balance between conserving power and maintaining convenience. Advanced features like hibernation and Power Nap offer additional customization options for power management and background tasks. Troubleshooting sleep issues by updating software, checking power sources, and resetting system components can resolve potential problems. By incorporating these tips and understanding the sleep settings on Mac, users can maximize energy efficiency, extend battery life, and create a tailored experience that suits their individual needs.
FAQ
The default sleep time on a Mac is typically set to 15 minutes of inactivity. After this period, your Mac will enter sleep mode to conserve power.
No, the sleep time settings on a Mac apply to the entire system and affect all users. Changing the sleep time will apply universally to all user accounts on the Mac.
Yes, changing the sleep time may interrupt active downloads and running applications. When your Mac enters sleep mode, it suspends processes and network activity, which can pause downloads and cause unsaved work in applications to be lost. It’s recommended to save your work and pause any ongoing tasks before the sleep time is reached.
No, the built-in sleep settings on a Mac are based on idle time rather than a specific clock time. However, you can achieve a similar effect by adjusting your Mac’s energy-saving schedule. In the Energy Saver preferences, click on the “Schedule” button and set a time for your Mac to start and stop sleeping automatically.
Changing the sleep time will not directly affect external devices connected to your Mac, such as external hard drives or displays. However, if the sleep time is set to a shorter duration, your Mac may go to sleep before the connected devices have a chance to enter their own sleep mode. You can adjust separate settings for external devices in their respective preferences.
